
The Girl in the Window Walkthrough
Every chain from the locked door to the lever, with methods instead of copied numbers.
This walkthrough clears the main door of The Girl in the Window. It does not spend paragraphs on the final twist; that lives on the ending page. Codes you see in screenshots here are examples. Rebuild yours with the notebook, as explained in randomized puzzles.
Play on Steam, Android, or iOS — the steps match. Input notes are on controls. If you only need one lock, skip to plant codes, the symbol cupboard, the TV dials, the window padlock, or the vampire safe. For pickups, use the item inventory. For the four walls, use the room map.
Part 1 — open the room
You start facing the sealed front door.
Take the candle from the small unit on the right. Open the middle drawer for a photo. On the left hooks, take the umbrella and move the coat to collect a torn paper.
Rotate right to the television wall. Take the goblet. Open the upper cupboard for another photo.
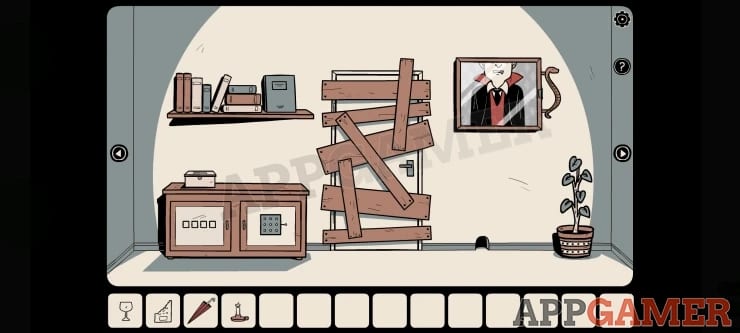
Rotate right to the boarded doorway. Take the gray notebook from the bookshelf. Inside is another photo and a torn page. Combine the scrap from the coat with that page. Four circled symbols now have Roman numerals. That order opens the low cupboard under the shelf — full method on the symbol lock page. Take the mirror.
On top of the same cabinet sits a four-digit box. The notebook’s plant page shows pot silhouettes in an order. Match each silhouette to a real pot in the room and count leaves. Enter that sequence. One common example is 5364; yours may be 4635, 6543, or 3465. Details: plant code. Take matches and another photo. Combine matches with the candle.
Put the lit candle in the mouse hole right of the boards. You will see a cable. Use the umbrella to pull the plug cable out. Take the rock from the plant pot on this wall.
Rotate to the armchair and window. Use the rock on the table bottle. Take the round-handle key and a glass shard. Inspect the broken socket left of the chair; take the square-handle key. From the two-drawer unit, take the VHS tape and read the diary if you want story without spoilers.
Back at the TV cabinet, the square key opens a door with electrical tape. On the floor under the TV, attach the cable and tape it, then plug it in. Power the TV, insert the tape, play. The image shows a missing dial that actually sits on the three-drawer unit by the front door. Collect that dial. While you are at the door, the round key opens the top drawer for a glove.
Part 2 — light, letter, padlock
Fit the dial onto the TV panel. The VHS clue (circles with lines above the girl’s head) tells you the dial positions. When they match, take the plastic handle. Combine handle and glass shard to make a knife.
On the armchair wall, cut a piece of cheese. Lift the seat cushion and cut the fabric underneath for a cross. At the front door, cut the peeling wallpaper to reveal a letter or pattern (often an M). That pattern is the grid for the remaining cupboard door on the boarded-door cabinet. Draw it, take the oval-handle key and a light switch.
At the window, open the electrical box with the glove. Rotate the tiles until the lines connect, then flip the switch above to light the outside lamp. Close the curtain. Four holes now punch light through.
Install the missing switch left of the front door and turn the room lights off. On the TV wall, four symbols appear in the window projection. Notebook squares with branch outlines tell you the order. Rebuild that four-symbol code — method on symbol lock. Turn the lights back on. Use the code on the padlock of the lower drawer under the window. Take the metal rod.
Part 3 — mouse, wine, vampire, lever
At the front door, pry the loose floorboard with the rod. Take the board and the garlic in the hole.
On the TV cabinet, the oval key opens a door with a bowl. Back at the mouse hole, place bowl, cheese, then board as a ramp. Catch the mouse. On the TV wall, a cracked pipe hides a key. Send the mouse in the upper hole; collect the hexagonal-handle key that falls out. That key opens the last cabinet door: screwdriver and wine. Combine wine with the goblet.
On the boarded-door wall, unscrew the vampire painting. Behind it is a four-symbol safe. Close the painting again to work on the portrait. The notebook lists four offerings: garlic, cross, goblet of wine, mirror. Order comes from the newspaper pinboard on the armchair wall — lift each clipping. Typical sets include Mirror-Cross-Garlic-Wine and Garlic-Wine-Cross-Mirror; yours will differ. Offer items in that order so the vampire reveals four glyphs. Enter them on the safe. Full write-up: vampire safe.
Take the lever inside and pull it. The front door unlatches. Step out only when you are ready for story. If you want the extra scene, read premium first so you do not close the game too early on mobile.
Inventory checklist
Candle, umbrella, torn paper, goblet, notebook, mirror, matches, plug cable, rock, round key, glass shard, square key, VHS, tape, dial, glove, plastic handle, knife, cheese, cross, oval key, light switch, metal rod, floorboard, garlic, bowl, mouse, hex key, screwdriver, wine, lever.
If an item is missing, rotate the four walls again before you assume a bug. The tools page is a printable-style list of the same chain.
If you are still stuck
- Numbers from videos fail → randomized puzzles
- Difficulty ranking → puzzle tier list
- Who Dan and Mia are → characters after you escape
- Steam versus phone → updates
The house is small. The walkthrough is long because the game hides verbs in furniture, not because there is a second map. Look twice, combine once, and never type a stranger’s code.
Frequently Asked Questions
Quick answers to the most common questions.
Why is my safe code different from this page?
The vampire glyphs randomize. Rebuild them from the pinboard order. See vampire safe.
Where is the mouse used?
After you catch it at the hole, put it in the cracked pipe on the TV wall to push out the hexagonal key.
Does this cover the secret scene?
No. Main door only. The extra scene is on the premium page.
Can I skip to the ending?
You can, but the twist is short. Use ending explained after the lever.